
The networking world is uncertain and we never when our existing networking device kneels down and denies working. In that scenario, connecting the range extender to the new WiFi connection becomes a difficult job. But, when it comes to people who have completed the Nighthawk extender setup, they find the task not that tedious. All thanks to the WPS method and the LAN cable method through which you can easily connect Nighthawk extender to the WiFi router. If you have been tired of searching for the perfect post on how to connect Nighthawk extender to new WiFi, then we hope that this blog will be your last destination.
This is because here we have written the instructions to connect the extender and new WiFi router using the two methods mentioned above. Know that the process can be initiated only if your WiFi extender is running on the default settings. Therefore, reset the extender first of all and then initiate the process of connecting your WiFi devices. Keep reading.
Before You Connect Nighthawk Extender to New WiFi
The steps to reset your range extender are highlighted underneath. Follow them before you connect the extender to the new WiFi router. It is important because if you do not do so, your extender will still try to extend the range of your previous router rather than the new one. As a result, the connection will fail.
• Plug your range extender into a wall outlet and switch it on (if not yet).
• Wait for the LED lights on your extender to become stable.
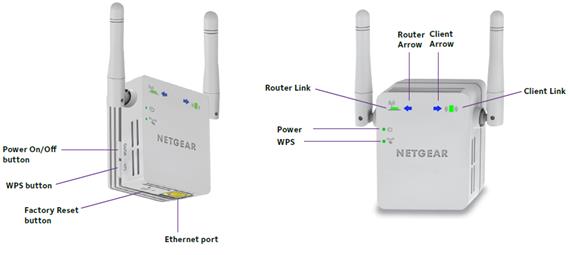
• Now, check the back side of the Nighthawk extender.
• Find the Reset hole.
• Get hold of a pointed object and press the button with its help for 30 seconds.
• Let the extender reset and reboot.
Kudos! Your extender is working on the default settings now. It means you can connect it to the new router wirelessly (WPS) or using a LAN cable. Read the upcoming sections to know how.
How to Connect Nighthawk Extender to New WiFi (WPS)
If your newly purchased WiFi router is WPS capable, then congratulations! You’re eligible for this method of connecting your WiFi devices (Nighthawk extender and router). To connect your WiFi extender to the router, follow the steps given below:
• Place your Nighthawk repeater or extender in the same room where your new router is placed.
• Be certain that you do not place the extender too close to the new router.
• Now, switch on the router and wait for the LED lights to get stable.
• Thereafter, get your extender powered up.
• Time to push the WPS button! So, push it on both WiFi devices one by one.
Note: It hardly matters on which device you press the WPS button first. Your focus should be on a successful connection between these devices.
• The 2.4GHz LED on the extender will light up.
• You should press the WPS button again on your devices.
• This time the 5GHz LED will light up.
• The connection between your devices is successful.
• You can now relocate your extender. But, keep it in the range of the router.
How to Connect Nighthawk Extender to New WiFi (LAN)
This section consists of the instructions to connect the range extender to the new WiFi router using a LAN cable. But, you must know that you can disconnect the Ethernet connection after your extender gets an instruction that it needs to boost the signals emitted by your new router. The steps mentioned below will let you know how to connect Nighthawk extender to new WiFi through a wired connection.
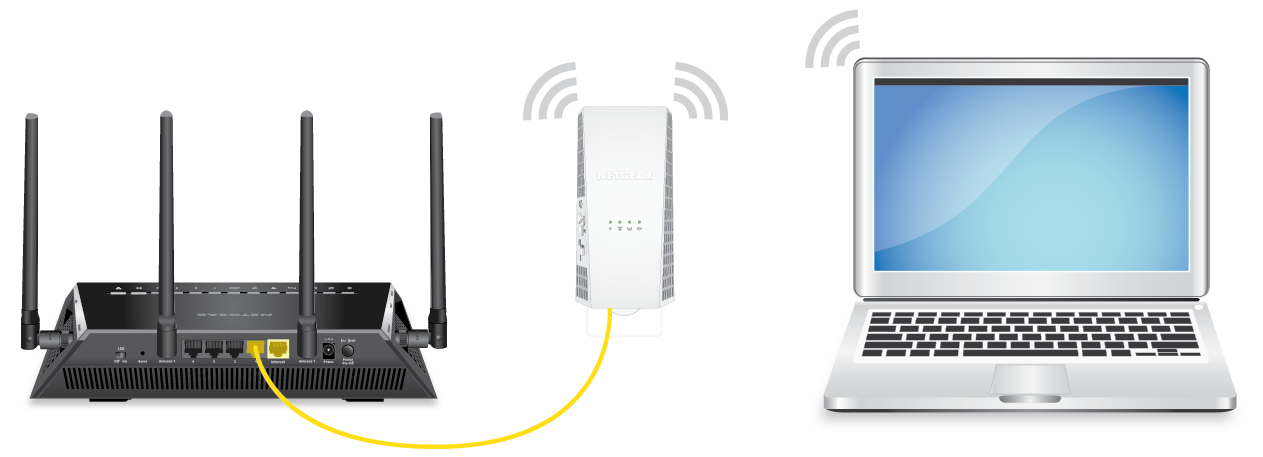
• Power down your router and connect it to the extender through a LAN cable.
• You need to connect the extender’s Internet port to the router’s LAN1 port.
• Once done, switch on the router and then your Nighthawk extender.
• Are the LED lights on your extender stable now? If yes, then switch on the computer.
• Open WiFi Utility and locate the WiFi network with the name Netgear_ext.
• For the WiFi password of your range extender, check the extender’s label.
• After connecting the extender to the computer, visit mywifiext.net using an updated browser.
• You might be asked to enter the extender’s admin details.
• So, enter admin into the Username field and password into the Password field.
• The New Extender Setup page will appear.
• Now, choose whether you want the extender to work as an access point or an extender.
• Thereafter, you need to select the new router’s network and enter its WiFi password.
• Click Connect and assign SSIDs to your extender.
• Keep following the on-screen prompts until you see the dashboard of your extender.
Verdict!
Learning how to connect Nighthawk extender to new WiFi router is beneficial for you in every way. It is because it is all about restarting the Netgear Nighthawk extender setup after resetting the extender. We hope that the instructions shared in this blog will help you connect two WiFi devices.